
How to draw Santa Claus on a graphic tablet?
With the approach of the New Year holidays, there is a pleasant feeling of joy for every person, regardless of age. For the new year, gifts and miracles are waiting for not only kids, but also adults. And of course, you can not ignore the main character of this holiday - Santa Claus. He is dressed in a long red fur coat with white stripes. He has a long white beard and a warm hat (in a coat). In one hand he carries a large bag with gifts, and in the other - a magic staff. Regardless of whether we believe in Santa Claus or not, he, for a long time, remains one of the most important symbols of the new year. Let's learn how to draw Santa Claus on a graphic tablet.
Tools and materials:
1. Graphic tablet (used Wacom Intos Draw, but any analogy is suitable).
2. USB connection to a computer or laptop.
3. Software Adobe Photoshop.
You can also use a simple pencil, an eraser and a piece of paper.
Steps of the work:
Step 1. In Adobe Photoshop, we create a new surface: File - New. We set the size of the new document: width - 850 pixels and height is 595 pixels. The white surface on which we will draw an illustration will turn out. For the brush, adjust the main diameter - 3-5.
Step 2. Draw a vertically stretched oval. Its upper part is slightly smaller than the lower one. Through the middle we will draw the center line, so that it would be more convenient to do the construction of the body:

Step 3. Now divide the oval in half. On top, we separate one circle for the head, and the second for the torso:

Step 4. On the lower part (from the belt downwards) we draw the edges of the Santa Claus fur coat, and on the head we point out the location of the cap:

Step 5. Next, draw the wide sleeves of our hero. His arms are raised and bent at the elbows, so that not only the outer part of the sleeves is visible, but also a little internal:

Step 6. The hands of Santa Claus are worn mittens, and the fur coat is tied with a long belt. At the bottom of the fur coat we'll make a strip. When walking, the fur coat will open slightly because of the wind, so at the corner we bend the fabric:

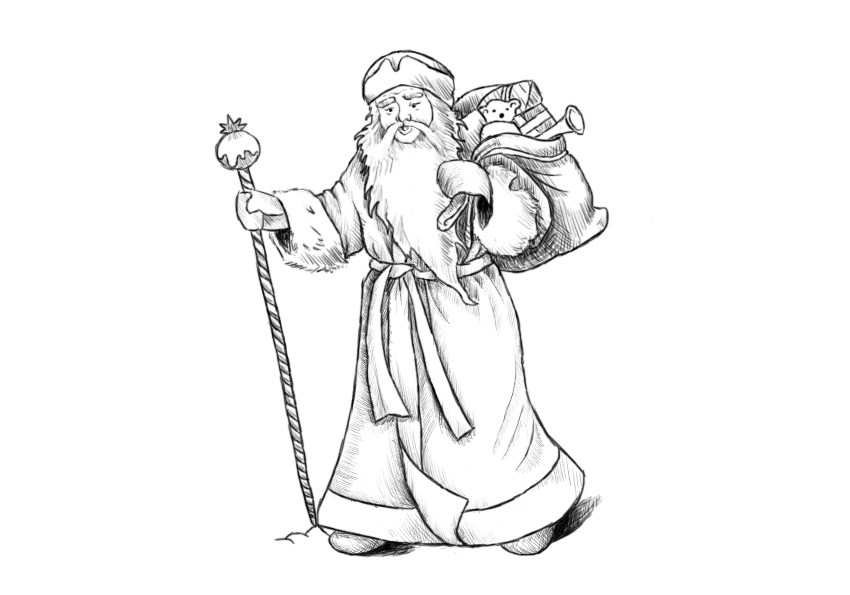
Step 7. We pass to the beard of Santa Claus. We draw it long, but the edges are wavy. In the right hand there will be a bag with gifts, and in the left hand there will be a staff (at the top of which there is a sphere):

Step 8. Let's do a face drawing. Add the eyes and eyebrows, as well as the nose and mustache. Draw common features, without detail:

Step 9. With an eraser remove the extra lines around the head. We will draw a beard of Santa Claus in more detail, adding wavy hair along the edge of his beard. On the edge of the face, from the place of growth of the beard, we draw several lines. On the face, under the eyes and above the eyebrows, we add a few wrinkles:

Step 10. We draw the sleeves of a fur coat, and especially we will work more fluffy cuffs. You can reduce the diameter of the brush, for convenience:

Step 11. Add shadows on top of the fur coat and sleeves. Do not forget about the beard and face. Shadow overlap evenly on the top of the character. A little later we'll make the fur coat shade darker:

Step 12. Now you can completely erase all the lines that helped us in the construction, they are no longer useful. We proceed to draw a shadow on the entire surface of the fur coat. This is a fairly time consuming process, but do not increase the diameter of the brush because of this, otherwise very rough strokes will come out:

Step 13. Santa Claus's boots are almost invisible because of the long fur coat, but when walking it is possible to notice their edges. They will be darker, in tone, from the fur coat, so draw more strokes to make them a bit darker:

Step 14. Gifts will be displayed from the bag: toys and boxes. Draw their outline and give a more natural shape to the bag:

Step 15. From above, on the staff, we add half of the star, and on the ball - ice. The base of the staff has a special texture, so we add rhythmic lines along the entire length:

Step 16. On the bag with toys, we add more strokes, because it is in the background, therefore, the most of the falling shadow is fixed on it:

Step 17. Next, you need to combine the entire picture. Strengthen the contrast of the picture with the help of shadows. Most will be concentrated around the folds of clothing and objects:
Step 18. The last thing missing in the picture is the background. Add snow drifts, a few trees and a Christmas tree. The drawing is completed:

We save the picture on the computer in JPEG or PNG format.
Although the process of drawing the figure of Santa Claus is quite time consuming, but the pre-holiday mood has to create amazing illustrations and therefore even a child has to cope with it. And the finished drawing can be safely presented to someone close to you or decorate with a New Year's card.


Drawing hacks
Drawing hacks

Mandala Drawing: Everything You Need to Know About Mandalas

Watercolor painting for beginners

Digital Drawing for Beginners
